• Skip to primary navigation
  • Skip to main content

Armstrong's Lighting

  • Buying Guides
  • Styles & Trends
    • Bathroom Lights
    • Ceiling Fans
    • Ceiling Lights
    • Lamps
    • LED Lights
    • Outdoor Lights
    • Smart Lights
    • Wall Lights
  • Wellness & Safety
  • Shop Products

Buying Guides

Choosing the Perfect Ceiling Fan

Choosing the Perfect Ceiling Fan

by admin · May 12, 2023

When carefully chosen, a unique ceiling fan will add to your home’s beauty, value, and ultimately save you money. Whether you are shopping for your first fan or you’re updating an old-fashioned relic, the process can be enough to make anyone’s head spin. Fans should be functional as well as attractive, but it’s easy to get buried in all of the expert recommendations and lighting lingo. If you give up and just pick the first fan you see that matches your room, you could be setting yourself for disappointment. Here are a few suggestions to keep in mind when searching for the perfect fan to complete your space:

Location

Ursula Page/Shutterstock.com

Before you do anything, you need to decide which areas in your home need better airflow and temperature control. Every house has a room or two that’s always hotter than the rest of the house! Also, consider putting a fan in the spaces where you entertain. When you have guests over it’s nice to be able to get the air moving to keep your guests comfortable.

Looking for outdoor fans? Pay attention to the rating. Wet rated fans have a special coating to help avoid water damage and rust. If your fan may come in direct contact with ocean spray, rain, or snow, a wet rated fan is what you need. Damp rated fans aren’t meant to come in direct contact with water, so they’re better suited to covered patio areas. 

Outdoor fans can be used anywhere, but you should never hang an indoor fan outside.

Size

JR-stock/Shutterstock.com

Once you’ve picked the perfect spot for your fan, take a look at the size of the space it needs to cool. Is it for a smaller space like a bedroom, or a larger area like a living room with vaulted ceilings? If your fan is too large, it will overpower your room and make it feel like you’re in a wind tunnel. If it’s too small, it won’t be able to move the air in the room, which will leave you disappointed. 

Ceiling fans are measured by the diameter of the blades, and there are a couple of ways you can figure out which size is right for you. The first option is to measure the longest wall in the room. 

Wall LengthFan Size
12 ft or less36 in or less
12-15 ft40-48 in
15 ft or more52 in or more

The second option is to calculate the square footage of your room. Most manufacturers have recommendations right on the box based on square footage, so you’ll definitely want to know that number! 

Square FootageFan Size
Up to 100 sq. ft.18” – 42”
100 – 225 sq. ft. 42” – 52”
225 – 400 sq. ft.52” and up
Over 400 sq. ft.Multiple fans

Height 

JR-stock/Shutterstock.com

The next step is to find the perfect height to hang your fan, and it all depends on the height of your ceilings. So grab a friend and pull out that tape measure!

If you have high, vaulted, sloped ceilings, you’ll need a downrod fan. A downrod is the metal bar that separates a ceiling fan from the ceiling itself. It’s purpose is to move the fan to the sweet spot in a room where it can circulate the air the most effectively.*

Ceiling HeightDownrod Length
10 ft12 in
11 ft18 in
12 ft24 in
13 ft36 in
14 ft48 in
15 ft60 in
16 ft72 in

*If your ceiling fan includes a light kit, reduce the length of the downrod by 12”

For more standard, 8-10 foot ceilings, you should look into a flush mount ceiling fan, often called a hugger. It does just what it sounds like: hugs the ceiling so the blades stay safely above the average person’s head. 

Light Kit

Ronrapee/Shutterstock.com

Most – but not all – ceiling fans come with a light kit, making it a multi-purpose fixture. The blades circulate air and the light kit provides ambient light.  If you’re replacing a light fixture with a ceiling fan, double check your fan to make sure it comes with lights so that you don’t end up in the dark!

Style

JR-stock/Shutterstock.com

Now that you’ve laid the groundwork, you’re ready to find your fan. Ceiling fans are a lot harder to swap out that throw pillows, so it’s really important to pick out a fan that matches your style! Here are some things to consider:

1. Light shades: This is the hardware that covers the bulbs on the light kit. Some shades are clear, providing ample light, while others have a more frosted look to soften to the glow. They come in a wide variety of shapes and styles, so don’t be afraid to ask around if you don’t immediately see something you love at our showroom!. Our lighting experts can get you pointed in the right direction quickly so that you don’t have to waste hours of your life comparison shopping online!

2. Blades: Fan blades come in a variety of finishes, including black, white, natural, oak, etc. Many fans have double sided blades, so that you can try both options in your space and choose the one you like best.

3. Hardware: Fan housings and hardware typically come in metallic hues like brushed nickel, chrome, bronze, or a painted color like black or white. Take a look at the other finishings in your room – if the handles and doorknobs in your room are silver, you probably won’t want gold hardware on your fan. Similarly, a sleek fan with black blades and chrome hardware would feel out of place in a country cottage. 

If you see a fan that you love but the finishes are off, don’t be afraid to ask! Many ceiling fan models are available in more than one set of finishes. 

Efficiency

PabloOrtega09/Shutterstock.com

Did you know that an inefficient ceiling fan will cost you money on your electric bill every month? To avoid this costly mistake, consider these tips:

  1. Look for Energy Star rated fans. These fans can use up to 20 percent less energy, helping you reduce your energy bill. 
  2. Think airflow. An underpowered fan will need to be left on at all times to keep a room cool. An overpowered fan will use more energy than you need. Make sure your fan is properly sized for your space. 
  3. Change the blade direction. Nearly every ceiling fan will have a small switch near the blades that will change which direction they spin. In the summer, run your fan counterclockwise. This pushes air downwards, which creates a cool breeze in the room. In the winter, run your fan clockwise. This pulls air upwards, which pushes the warm air trapped near the ceiling back down into the room. 

Finding the right fan doesn’t have to be a headache. If you follow these steps, you can feel confident in knowing that you are choosing the best ceiling fan for your room. 

Come on in and see us! You can check out your new fan in person before you take it home to make sure it’s exactly what you want! And our lighting specialists are happy to help you with any step along the way, from choosing to installing the perfect ceiling fan for your home. 

Filed Under: 2021, Buying Guides, Ceiling Fans

Bathroom Lighting Buying Guide

Bathroom Lighting Buying Guide

by admin · Apr 14, 2023

Breadmaker/Shutterstock.om

Morning routine matters. Plenty of health experts have shared their research and expertise on the topic, and it’s about time we shared ours. We are staffed with people just like you—people who sometimes wake up late and stumble out the door, who wish they had more time for the gym, who care about doing their best and getting a good start to the day.

When we wake up each morning, we want a routine that maximizes energy, increases confidence, and creates momentum for the day’s tasks. And because we work in a lighting showroom, we know how much the atmosphere of your surroundings can influence that.

Specifically, a good portion of the morning takes place in the bathroom. The ambiance (or lack thereof) in your bathroom can have a significant effect on your morning. Dingy, dim bathroom lighting hardly reflects the high energy levels our bodies experience after a full night’s sleep, nor does it lend confidence for your day. 

On the other hand, good bathroom lighting:

  • Augments your body’s natural energy 
  • Improves confidence and mood
  • Create a powerful charge for the day  
  • Aids relaxation in evenings

Wondering how to make this happen in your bathroom? Here’s a breakdown of different layers of bathroom lights, then an in-depth review of how to apply them in your space.

Lighting in Layers

Artazum/Shutterstock.com

Ideal bathroom lighting has 3 categories, or layers: general lighting, task lighting, and accent lighting. 

  1. General Lighting lights a room without help from other sources. Also called ambient lighting, it is even-spread and uniform. Can lighting is one popular option here.  A large window can also provide natural ambient light.
  2. Task Lighting addresses a specific task.  Pendant lights flanking a vanity, for example, aid in makeup application or shaving. Bathroom task lighting is usually bright and direct for full face illumination. 
  3. Accent Lighting is mostly atmospheric, often drawing attention to a high-lit or low-lit area. Think over-the-tub chandeliers, floor-lighting, etc. 

Between these three layers of bathroom light, aim to have between 70 and 80 lumens of light per square foot of bathroom space. You can calculate this by multiplying the length and width of your bathroom (including bathtub or shower), for total floor space. Determine total lumens by adding together the capacity of each bulb in the bathroom, then divide the lumen total by square footage. 

Example: Your bathroom is 10’ by 6’, which totals 60 sq. feet. You have an over-the-mirror fixture with four bulbs, each with a capacity of 1100 lumens. 4,400 lumens divided by 60 sq. ft. is 73 lumens per square foot. Plenty of light!  

General Lighting

If you’re new to the lighting game, here are four types of ambient fixtures that work well in the bathroom. Recessed lights are inserted into the ceiling itself, whereas flush lights are attached directly onto the ceiling. Semi-flush lights hang with a little space between the ceiling and the fixture, while chandeliers hang furthest from the ceiling. Let’s go through each type. 

1. Recessed (Can) Lights

Recessed lights are wonderful. They’re more difficult to add into an existing bathroom, but if you’re remodeling or building a bathroom, these are a great choice! Around the house, setting cans 3-4 feet away from walls in a 6-8 foot spaced grid pattern is a good general rule to follow.  In bathrooms, the spacing tends to be closer, at 4-5 foot apart throughout the room and in the shower. 

2. Flush Lights

The most traditional and cost-friendly option for ambient lighting, flush lights are a safe option for any space. If you already have one but worry about its dim lighting, switching to LED bulbs is a great way to fix that. Check our catalog to learn more about LED bulbs and flush fixtures.

3. Semi-Flush Lights

If you’re looking for a little extra class without going full-blown chandelier, semi-flush is for you. There’s a lot of creative variation here, and semi-flush lights are sure to improve the look and lighting of your bathroom. 

4. Chandelier

It might not seem possible in a bathroom, but trust us—it is! Upgrade your bathroom’s look by using a mini chandelier, which still accommodates an 8-foot ceiling with plenty of walking space. Chandeliers often have a 4-5 light capacity versus the traditional 2-3 bulb socket in a flush or semi flush mount, adding extra light and extra style.  

Ambient Lighting Pro Tip: Whatever fixture type you prefer, choose one that’s U.L.-rated for wet or damp locations. Bathroom lights should feature tight construction that resists condensation.

Task Lighting

Targeted lighting can greatly improve the efficiency and quality of makeup application, shaving, and similar activities. Ideally, these lights imitate natural light without creating distracting shadows, making it easier for you to do your job. Here are a few common types of task lighting for bathrooms. 

1. Pendants

These hanging lights usually flank your bathroom mirror, adding extra light at the level of your face. They come in a lot of beautiful varieties, but always choose function over form when deciding on these lights. Luckily, we offer plenty of bathroom pendant lights that accomplish both!


2. Sconces

These wall mounted lights come in several styles, such as lanterns, candles, or modern varieties. Some are meant to perform the task of up/down lighting and others are specific for shining out, more appropriately lighting your face.  The latter is the better fixture for bathroom tasks. 


3. Above Mirror Lighting

You could also consider a 2-5 bulb vanity light above the mirror.  Conveniently, some fixtures are directional, allowing you to control where the bulb shines. Just be aware that light directly above your head can cause shadows on your face.

Task Lighting Pro Tip: Mount your sconces and hang pendant lights at eye level; between 60-72” from the ground up.

Accent Lighting

In bathrooms, accent lighting comes in varied forms, depending largely on the specific functions and layout of your bathroom. Accent lighting draws attention to architecture and creates an element of awe. It also enhances the functionality of your bathroom, as with the options suggested below.

1. Toe-Kick Lights

Reduce in-the-dark stumbling by adding motion sensor lights beneath your bathroom vanity. Called “toe-kick lights”, these motion-activated lights make midnight trips to the bathroom effortless. 

2. Soffit Lighting

Most common in kitchens, soffit lighting is any kind of border or perimeter lighting, like on the tile shelf next to the bathtub in the picture above. They add a beautiful atmospheric light to the bathroom as well as enhancing functionality. 

3. Additional Sconces

Though we’ve already addressed these as task lights, when they’re placed on other walls of the bathroom, they function as accent lights. Sconces are a classy way to add décor, light, and atmosphere. 

Accent Light Pro Tip: Consider the “cleanability” of each fixture. Lighting fixtures made with a shade or fabric are harder to disassemble and clean, and may get sticky with bathroom moisture. Glass fixtures are easiest to maintain in bathrooms.

Final Thoughts

If morning routine really matters, so does bathroom lighting! For every bathroom, every style, and every budget, there is a way to start adding more light to your mornings. At Armstrong's Lighting, our lighting specialists are always available to discuss your unique needs, so give us a call and we’ll help you get started. Until then, we’ll leave you with three more priceless Pro Tips for bathroom lighting.

Pro Tip: Light for Function

Not all bathrooms are a major or grand part of every home.  Some bathrooms are small and intimate like small-scaled master bathrooms, powder baths, Jack and Jill kids’ baths, pool baths… so light for the function of the bathroom. For example, pool baths are utilitarian, so a simple vanity light over the mirror would be sufficient.

Pro Tip: Pay Attention to Paint

The paint color in your bathroom influences the effectiveness of your bathroom lights.  Lighter paint tones absorb less light, making your bathroom appear brighter. Darker paint tends to absorb more light and will require more lighting fixtures/more bulbs to compensate for that paint choice. Paint sheen (high gloss, satin, flat, etc.) also influences your light. 

Pro Tip: Leveraging Light Dimmers

Wall dimmers customize the level of lighting and mood of the bathroom. As you examine fixtures, each product description specifies whether a lighting fixture is dimmable or non-dimmable. If the fixture is dimmable and takes light bulbs, be sure to purchase a bulb that is also dimmable.

Filed Under: 2021, Buying Guides

Smart Lighting 101: 5 Top Tools to Upgrade Your Smart Home

Smart Lighting 101: 5 Top Tools to Upgrade Your Smart Home

by admin · Mar 8, 2023

Everyone talks about “smart homes,” but what does that really mean? While smart assistants are often the foundation of any smart home, they aren’t truly smart on their own. Smart lighting is another essential element of your smart home. It includes a wide range of electrical products that use software to interface with your smart hub to give you enhanced control, function, and flexibility of your lights.

We know it can be overwhelming sorting through all of the options available to you as you build your smart home. So, we put together this quick guide to some of the most popular smart lighting tools to help you get started!

Special note: Before you go out and purchase any smart light accessories, remember to check for compatibility. Each smart lighting tool is programmed to work with one or more smart home hubs or apps, like Google Home, Amazon Alexa, Apple HomePod, etc. It will be much easier to keep track of everything if you can control them all from the same place!

  1. Smart Bulbs

Smart bulbs are a great way to get the most out of your lighting. Smart bulbs are often color-changing or range in temperature. These bulbs will work with most standard lamps and light fixtures. 

Smart bulbs are typically LED bulbs and are also energy- and heat-efficient. In addition, they have a long life and are safer than fluorescent bulbs since they use a microchip instead of gas to create their glow. 

Smart bulbs can range in price, averaging at $7-$15 a bulb. 

  1. Smart Plugs and Outlets

You don’t have to change all your bulbs to get the benefits of AI and voice activation. Instead, you can plug your lamps into a smart plug or swap out the entire outlet! This will allow you to use multiple light fixtures or devices in the same place. 

Smart plugs simply plug into your existing outlet as an extension. Then you plug your lamps or other devices into the smart plug, and you’re ready to go!

Smart outlets take a little more work to install, but it’s definitely within DIY reach. While specific installation steps will vary slightly by your smart outlet choice– the basic installation steps are the same. Check out this YouTube tutorial to get a good idea of what you’ll need to do! 

Special note: Always be sure to follow the brand-specific installation instructions that come with your device. 

Smart plugs and outlets range from about $15 to $30 each.

  1. Smart Switches

Try replacing your dumb light switches with something smarter! Smart light switches help you to click through programmed light scenes so you can switch from day to night to entertaining light scapes at the touch of a button. 

Installation is as simple as swapping your current light switch for the next. Check out this YouTube video for a quick and safe installation. 

Expect to pay $25 to $45 amount for your smart switch. 

  1. Smart Bulb Bases

Another way to keep your existing light bulbs but enhance smart features is to add a smart base to your light bulb. Simply unscrew the light bulb, screw the new base on, and reinsert it into the light fixture. Now your bulb’s power is controlled by the base instead of relying on the light switch!

Smart bases won’t enable features to a bulb that isn’t designed for dimming, temperature, or color changes. But it will allow you to incorporate AI, voice activation, and remote reach from anywhere with your phone. 

You’ll likely pay between $15 and $30 for a smart bulb base.

  1. Smart Lighting Kits

Skip the hassle of buying individual tech with a smart lighting kit. These kits include several bulbs and other pieces of tech to get you started for a discounted price. 

These kits range anywhere from $60 to $200, depending on your selected bundle.

Need Help Creating Your Smart Home?

Proper lighting is essential to a fully functioning home– but it can be challenging to nail balanced brightness, great fixtures, and a budget! Contact the experts at Armstrong's Lighting for advice on your project!

Filed Under: 2023, Bulbs, Buying Guides, LED, LED Lights, Light Bulbs, Smart Lights, Styles & Trends, Styles and Trends

How Many Light Bulbs Do You Need? Understanding Lumens

How Many Light Bulbs Do You Need? Understanding Lumens

by admin · Feb 20, 2023

Are you updating your light bulbs, but not sure how bright you need them? Or how many bulbs your room needs?

You’re not alone in the confusion. It can be difficult reading the package in the hardware store and understanding what the bulb will do for your home. 

This post will briefly touch on how lumens work and then guide you on how to make sure you have the right light for each room in your house.

What Are Lumens?

With major innovations in lighting over the past twenty years, bulbs have become much more efficient. That’s great news for your electric bill and the environment! But a side effect is that watts are no longer a good measurement for brightness. 

Watts measure the amount of energy used by the bulb. When all bulbs were incandescent, this also indicated brightness– the higher the watts, the more energy used, the brighter the bulb. 

But with more efficient bulbs, like halogens and LEDs, much less power is used while still producing bright light. So a 40 watt incandescent light gives off the same light as an 8 watt LED! 

So how will shoppers know that an 8 watt LED will replace their 40 watt incandescent? Instead of measuring power use, lumens measure brightness. Now no matter the energy efficiency, you can compare bulbs apples to apples. 

How Many Lumens Do I Need?

So how many lumens do you need for your space? To calculate the right lumen range, you need to know the square feet of the space and the proper foot candles for the area. 

The square footage of your room will help you know how much light you need– the bigger the space, the more light you need. To find out your square footage, simply measure the length and width of the room, then multiply those two numbers. 

For example, if your room is 10 feet by 12 feet, your room is 120 square feet (10×12=120). 

“Foot candle” is a less familiar term, but it means the brightness of a light source from one foot away. The target foot candle range will depend on the activity of the room. For workspaces like kitchens and offices you’ll want more light (more foot candles), and for bedrooms and dining rooms you’ll want less light (fewer foot candles). 

Once you have the square feet of your room and the target foot candles, then you can determine how many lumens you need. Simply multiply your square feet by the desired foot candles!

Let’s say that your bedroom is 120 square feet. Multiply 120 by 10 for the low end and by 20 for the high end of the target zone. 

120 x 10 = 1200

120 X 20 = 2400

Now you know that you need between 1200 and 2400 lumens for your bedroom!

Simple Cheat Sheet

If you don’t want to worry about foot candles, here’s a chart with a general estimate of how many lumens you need per square foot per area of your home. Remember, these calculations help determine the total light a room needs. But you’ll often concentrate light above tables, countertops, or a desk.

So if your living room is 15 feet by 20 feet, your total square footage is 300 (15 x 20 = 300). Then multiply that by the recommended 10 lumens to get a minimum of 3,000 lumens for your living room (300 x 10= 3,000). 

How Many Bulbs Do I Need?

It may seem overwhelming to need a few thousand lumens for your room. Don’t worry– you will still use relatively few bulbs to get all the light you need. For reference, an 8 w LED bulb will give off about 450 lumens of light. 

With just a few bulbs, you’ll have all your lighting covered. Put three in the ceiling fan, add a lamp with one bulb, and you’re done!

Need Help?

Proper lighting is essential to a fully functioning home– but it can be challenging to nail balanced brightness, great fixtures, and a budget! Contact the experts at Armstrong's Lighting for advice on your projec

Filed Under: 2023, Bulbs, Buying Guides, Informational, Light Bulbs

Ceiling Fan Terminology Explained

Ceiling Fan Terminology Explained

by admin · Feb 10, 2023

A Helpful Glossary of Common Ceiling Fan Terms

If you’re shopping for ceiling fans and it’s starting to feel like the descriptions are written in code, don’t worry! We’re here to solve the mystery with a list of basic terms you’ll need to know when looking for the right ceiling fan.

Ceiling Fan Types

Ceiling fans are most often categorized by their motor type, mount type, and/or weather rating. 

Motors

AC and DC Motors

AC motors (alternating current motors) are the most popular ceiling fan motor. They’re typically less expensive than DC motors, which is great for budget buyers. They are relatively energy efficient, are very reliable, and come with around three to four different fan speeds. 

DC motors (direct current motors) are a newer technology and often use a remote instead of a wall switch. DC motors make a quieter, more powerful fan with more speed options and are more efficient than AC motors. 

Dual Motor

Dual motor fans have two adjustable fan heads attached to a central motor. Each head is adjustable to its own speed and angle. 

High-Velocity Motor

A high-velocity fan is a powerful fan. It produces a higher-than-normal amount of airflow, providing you with a stronger breeze. 

Mounts

Downrod/Shank/Extension Rod

The multiple terms for this accessory are purely regional, and all mean the same thing– the rod or bar installed between the ceiling and the fan. Downrods can be used in many rooms but create the most impact in rooms with high ceilings. Not only do they pull the eye upwards and make the room feel bigger, but they also bring the air circulation closer to you.

Standard Mount

This type of mounting system is for level ceilings. Standard mounts usually come with a 3- to 5-inch downrod, so the fan slightly hangs down into the space.

Hugger or Flush Mount

These are perfect for low ceilings and tall people. Huggers are mounted against the ceiling and don’t use a downrod. Depending on the ceiling height, huggers or flush mount fans can help the ceiling seem higher while keeping your air circulated and fresh.

Low-Profile Fan 

For a fan to be considered low-profile, it must hang down less than 12 inches from the ceiling. Most low-profile fans are flush mounts, but some fans with short downrods are small enough to qualify as low-profile as well.

Sloped Mount 

A sloped mount is a mounting system that includes a downrod that allows the ceiling fan to be installed on a vaulted or slanted ceiling. The base is designed to let the downrod and fan hang at an angle when mounted so that the fan will be perpendicular to the floor.

Rating

Wet Rated or Outdoor Rated Fans 

Outdoor or wet rated fans are designed to withstand direct contact with rain and snow. Carefully read the packaging of your outdoor fan because not all fans can handle the same weather exposure. If you live in a particularly wet or stormy area, you’ll need a tougher outdoor fan.

Industrial and Commercial Fans

Industrial fans have powerful motors and curved blades, and they can run continuously, making them ideal for large, open areas like warehouses and gyms. Commercial fans are heavier-duty than standard fans and more aesthetically pleasing than industrial fans. They’re commonly found in schools, businesses, and restaurants.

Ceiling Fan Measurements 

This section covers the most common measurements used to describe a ceiling fan’s function and size.

Airflow (CFM)

Cubic feet per minute (CFM) refers to the amount of air moved by a ceiling fan, using the amount of air moved per cubic foot in one minute as the metric. The higher the airflow a fan uses, the more efficient your home can be as you recycle heated or cooled air. According to Energy Star, 75 CFM is the minimum airflow of an efficient ceiling fan.  

Blade Pitch 

The pitch measures the angle of the blades compared to the ground. Fan blades are slightly angled to push the air around. (If they were parallel to the floor, they wouldn’t do much!) The angle of blade pitches typically ranges between 10 and 25 degrees, but the most efficient is from 10 to 15 degrees. 

Blade Sweep or Span 

A fan’s sweep or span measures the diameter of the circle created by the blades. You’ll need to know the span of your fan to make sure it will fit properly in your room – if it’s too large it could scrape walls or snag curtains. On the other hand, it may be distracting and look out of place if it’s too small.

Motor Speed (RPM)

Revolutions per minute (RPM) refers to the speed of the blades as they rotate, measured by how many times the blades make a complete circle in one minute. High RPM fans move more air than low RPM fans of the same size, making them more efficient. 

Watt Equivalence

Some fans will require more electrical power (watts) than others, so it’s essential to have a good understanding of how much strain your new fan will put on the existing circuit. A good rule of thumb is the longer the fan blades, the more watts it will use. Expect your fan to use 55 to 100 watts.

Weight

Residential ceiling fans typically weigh anywhere from 8 pounds to 50 pounds. Keep in mind that lightweight ceiling fans are designed to hold their weight alone. You should never add anything to a ceiling fan that wasn’t in the original kit without carefully reading the manufacturer’s instructions. Some ceiling fans allow for customizable light kits. In that case, be sure to check the packaging for how much additional weight it can hold.

Number of Speeds

Most ceiling fans will have multiple speed settings so that you can control the amount of airflow and circulation in your space. Most fans will have three speeds (slow, medium, and maximum speed). You’ll also want to see if your fan can reverse direction– this will help pull warm air down from the ceiling during the winter and help to cycle your heated air.

Dimensions

You’ll need to check several measurements to ensure your fan fits correctly in the space. For example, both depth and width can refer to the blade span (or the size of the circle the fan will make). The width can also describe how wide the individual blades are. Finally, as mentioned earlier, the downrod is the pole that connects the fan to the ceiling mount. Together, these three dimensions will tell you how much space the fan will take up.

Pro tip: All fans are designed for specific square footage, meaning that some are designed to push air through large rooms while others are for small rooms. Fans designed for bigger spaces would be disruptive in a smaller room (and vice versa). The packaging of your fan will tell you the intended size of the room, so make sure to check the square footage of the intended space and match it to the appropriate fan. 

Parts and Accessories 

The final section describes potential upgrades and customization options to consider while shopping for your ceiling fan.

Light Kits

Many fans come with a light fixture attached (called an integrated light), but some can be purchased and attached depending on the fan. There are three different light kits that you can use with your fan: uplight kits which sit on top of the fan and point upwards, branched or stemmed kits use globes or shades that point up or down, but the most common light kit is the bowl or shade kit which attaches to the bottom of the fan. Keep in mind that some ceiling fans with an integrated light may not include a bulb– you may need to purchase bulbs separately.

Remote Control

Many fans available today are remote control or smart-home compatible. A remotely controlled fan may seem like a luxury, but it’s also very practical – especially for those with extremely high ceilings! Depending on the model and features, you’ll be able to adjust the lights, fan direction, and fan speed with ease. 

Reversible Blades 

Some fans allow for their blades to spin either clockwise or counterclockwise. This functionality helps to customize airflow according to the season. For example, the blades should turn counterclockwise in the summer to push the air down (a downdraft), providing cool breezes.  The fan blades should rotate clockwise to pull air upwards (an updraft) in the winter, efficiently recycling heated air without cooling the room. You can either toggle the switch on the fan or use a remote to change the direction of the blades. 

———————-

Ready to switch out your builder-grade fan or install a new one in the place of an existing light fixture? Now that you have a reference to all of the features and parts of a ceiling fan, you can shop confidently.

If you’d like additional information, a professional opinion, or installation assistance, contact the experts at Armstrong's Lighting, and we’ll make sure you get exactly what you are looking for! 

Filed Under: 2022, Buying Guides, Ceiling Fans, Informational

Gorgeous Nature-Inspired Rooms You’ll Want to Escape To Immediately

Gorgeous Nature-Inspired Rooms You’ll Want to Escape To Immediately

by admin · Jan 21, 2023

When you’re designing your house, finding inspiration is key. Taking a step outside can give you a fresh perspective – there’s no better inspiration than mother nature herself!  No matter what space you’re working on, drawing from the beauty of nature will make your home feel like paradise.

The combination of earth tones and natural materials in these rooms almost makes them feel more like they should be in National Geographic than a home decor magazine – and we mean that in the very best way possible. 
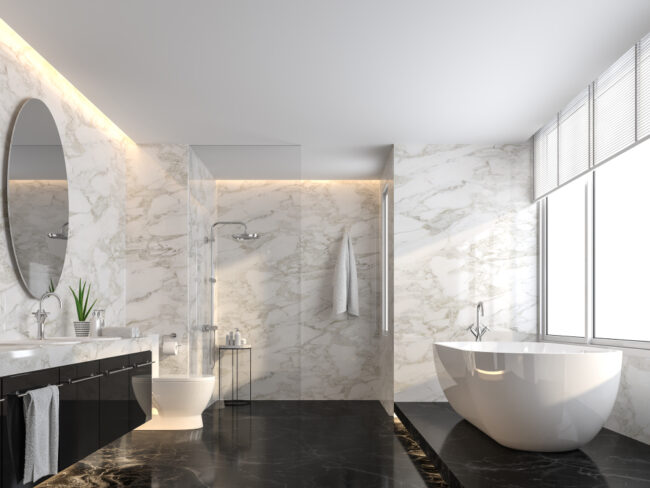
Bathrooms

Picture yourself after a long day of work. You’re exhausted, and what you need more than anything is a moment to yourself. You finally get some uninterrupted time to sit in the warmth of the tub and it feels good. The anxiety melts away. Your bathroom can be a natural refuge from your stress. When you put a little effort into your bathroom, it’ll pay off!

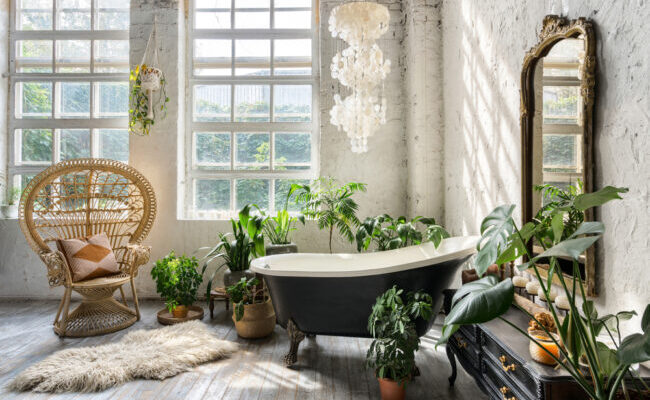
The owner of this room has a green thumb that brings the whole room to life. To complement the plants, they chose a macrame chandelier that’s uniquely fitted for this bathroom. Warm wood and wicker also feel right at home in this organic space. The black furniture and tub ground the look, bringing an effortless cohesiveness. You’d have a hard time feeling anything but relaxed here.

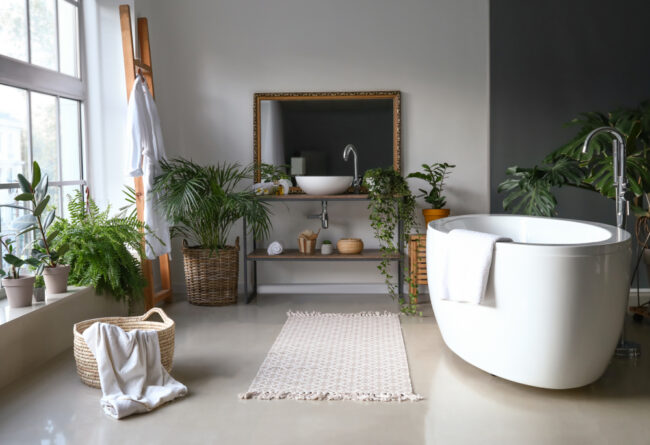
This light and airy space incorporates natural materials like wicker and terracotta pots. The foolproof combination of warm wood tones, green plants, and neutral, natural colors will always leave you feeling like you’re stepping into an oasis! This room is definitely a no-interruption zone.

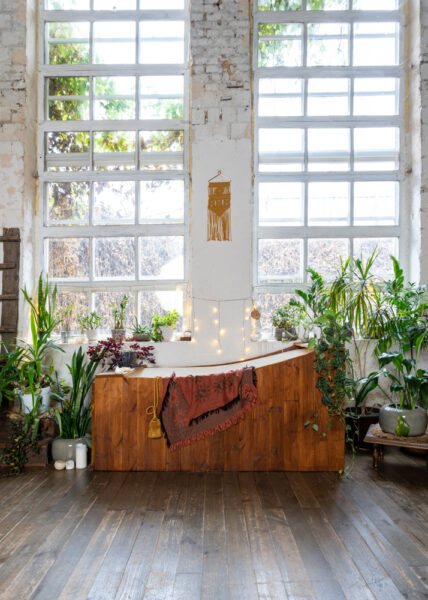
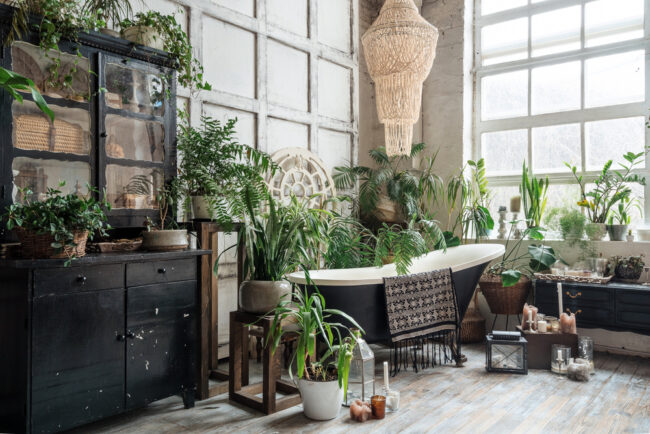
If it was possible (or ethical) to steal a bathtub, we’d be walking out of this bathroom hauling this one! The wood exterior is a nature enthusiast’s dream base for relaxation. The twinkling lights behind it are also a charming touch to give the bath a glow. 
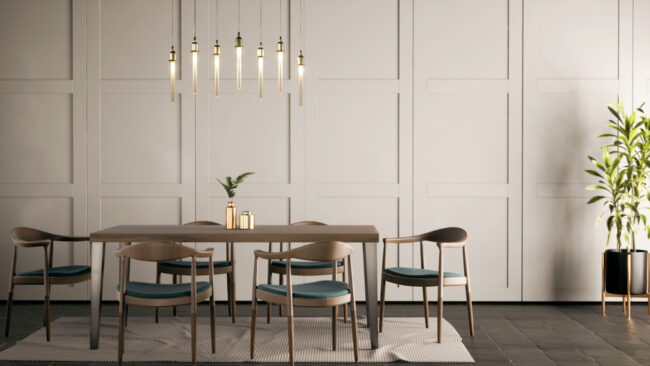
Living Rooms

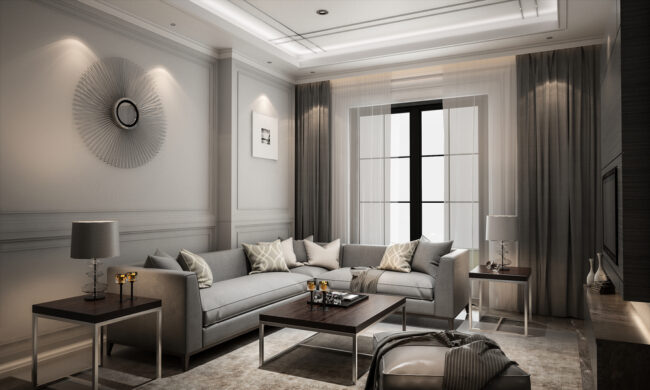
The living room is the main hub of the house. It’s where work, relax, and entertain guests – you live here. Whether you choose a paired back approach or go full maximalist and pull out all the stops, make sure to include some natural materials to ground yourself and make the living room feel more like home.

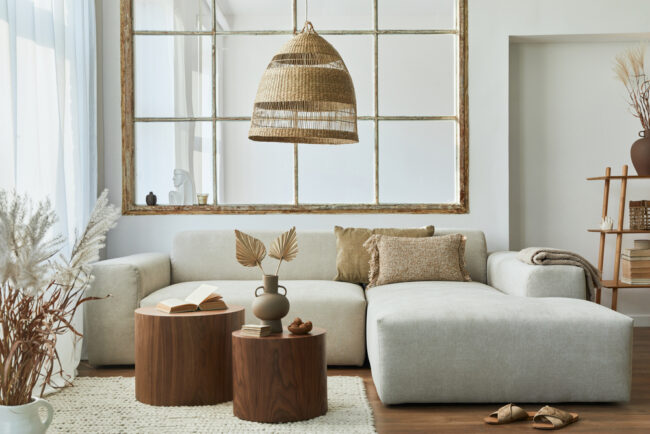
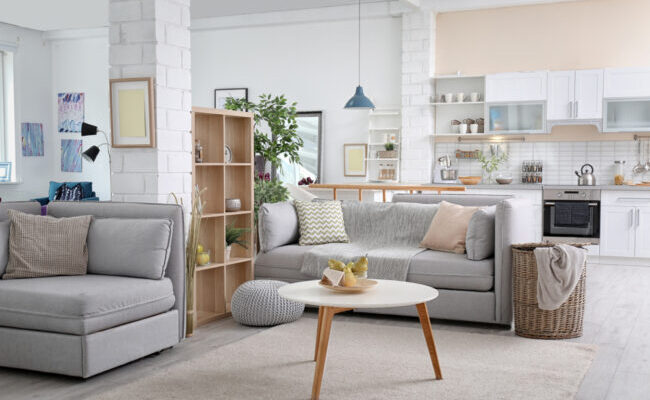
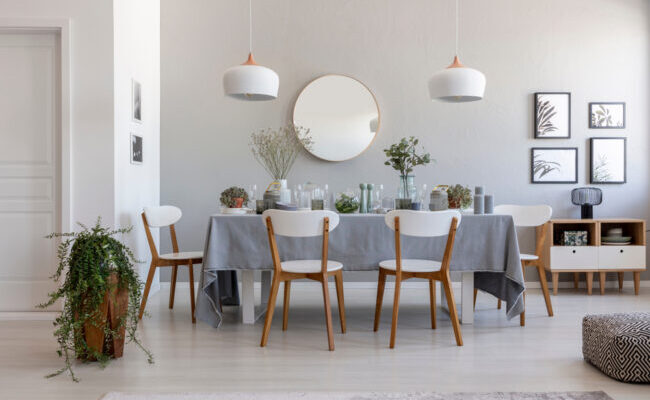
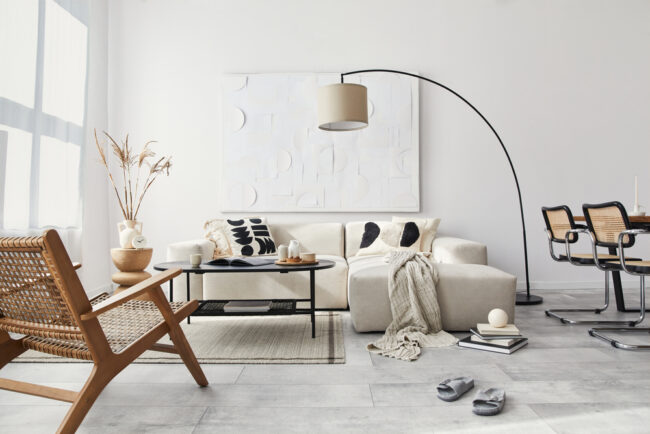
Neutrals are the star of the show in this living room. We love the texture the pendant light brings and how it coordinates with the mirror frame and the accessories in the room. The color palette may be limited, but each piece works together to create a neutral haven where texture is the star of the show. 

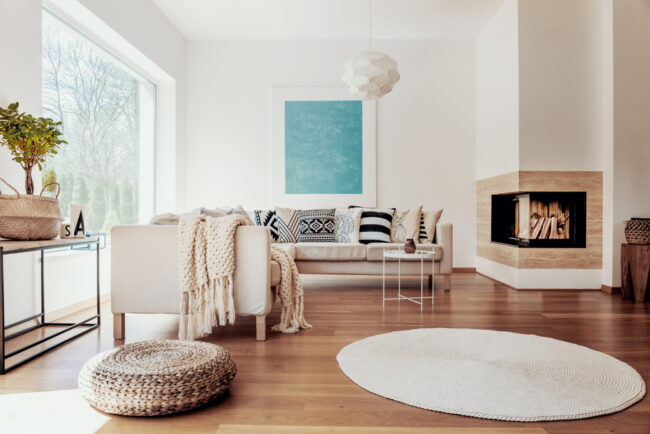
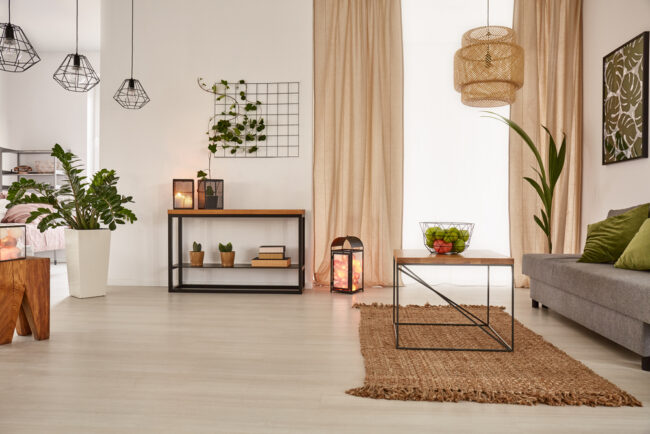
This nature-inspired design would work well in a space of any size. When you’re strapped for square footage, picking a smaller couch that will still accommodate your needs is a smart choice. A pendant light also shows creativity since it won’t take up any extra floor space. It’ll give you the ambiance for an intimate conversation or some light for reading. The texture of the wicker and wood here is also stunning. Adding burnt orange brings a tiny pop of color to make you feel extra happy!

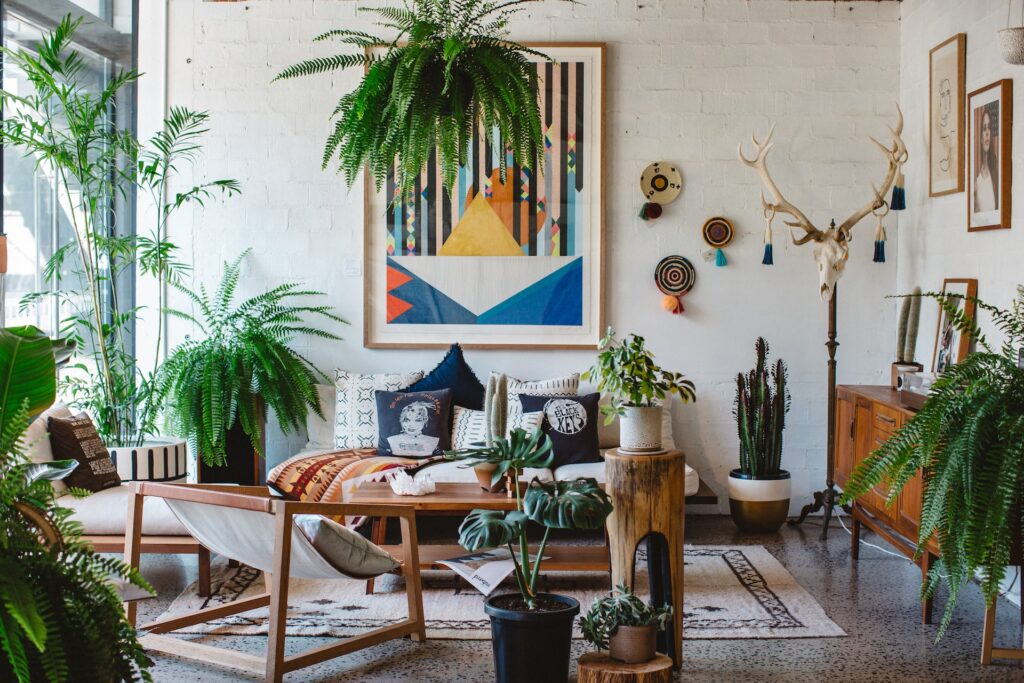
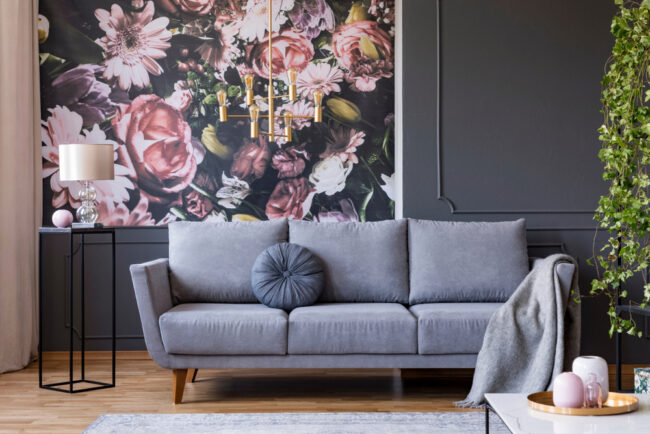
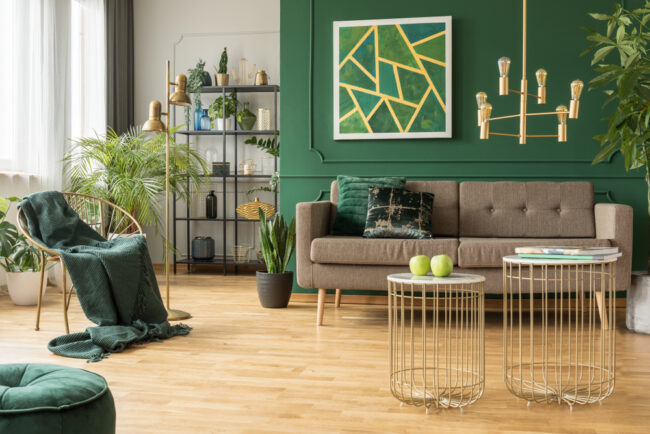
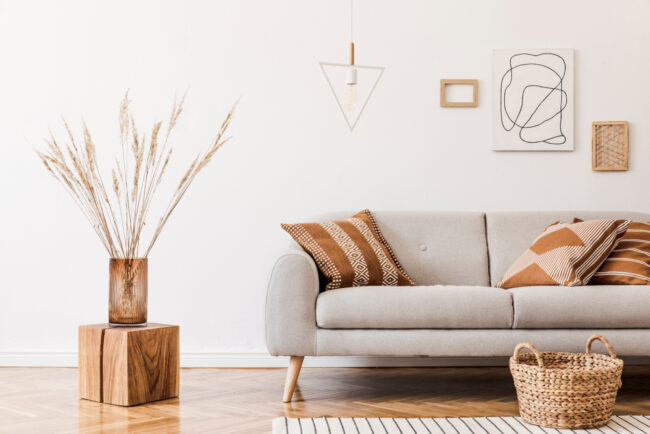
This colorful living room is oozing with style! Who said organic design has to be boring? We can’t help but feel insanely jealous of whoever owns this room. Everything here – the colors, textiles, plants, and warm wood furniture – is to die for. Don’t be afraid to go bold and bright if it makes you happy. This is a living room anyone would be lucky to come home to!

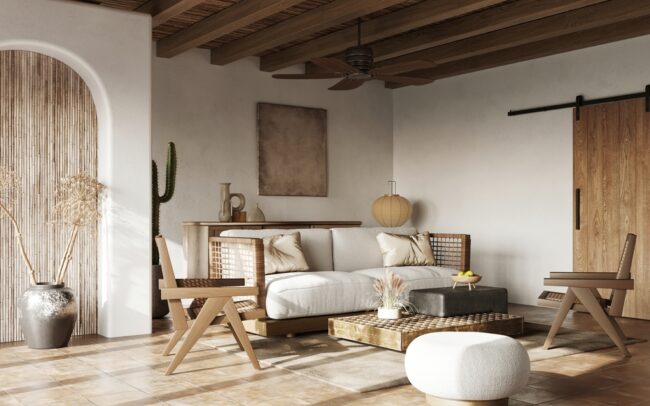
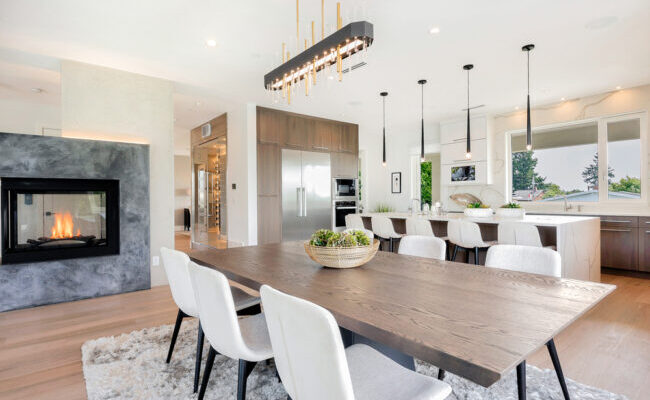
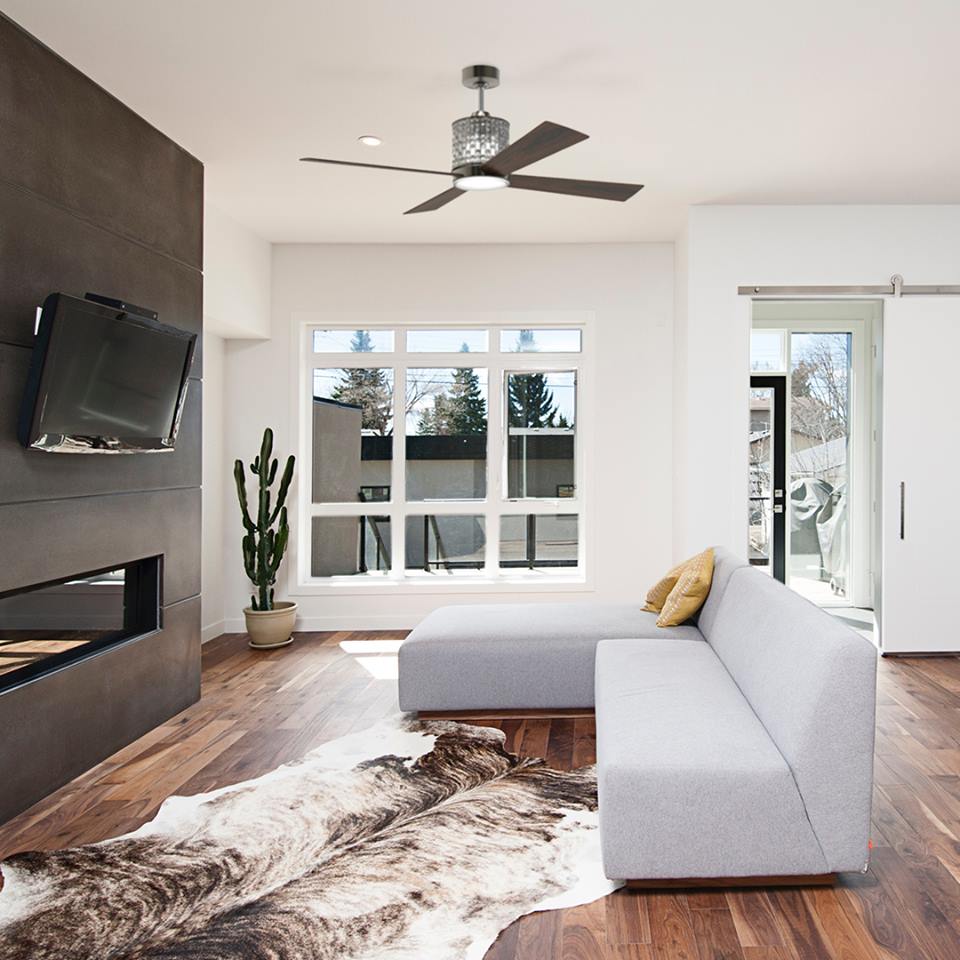
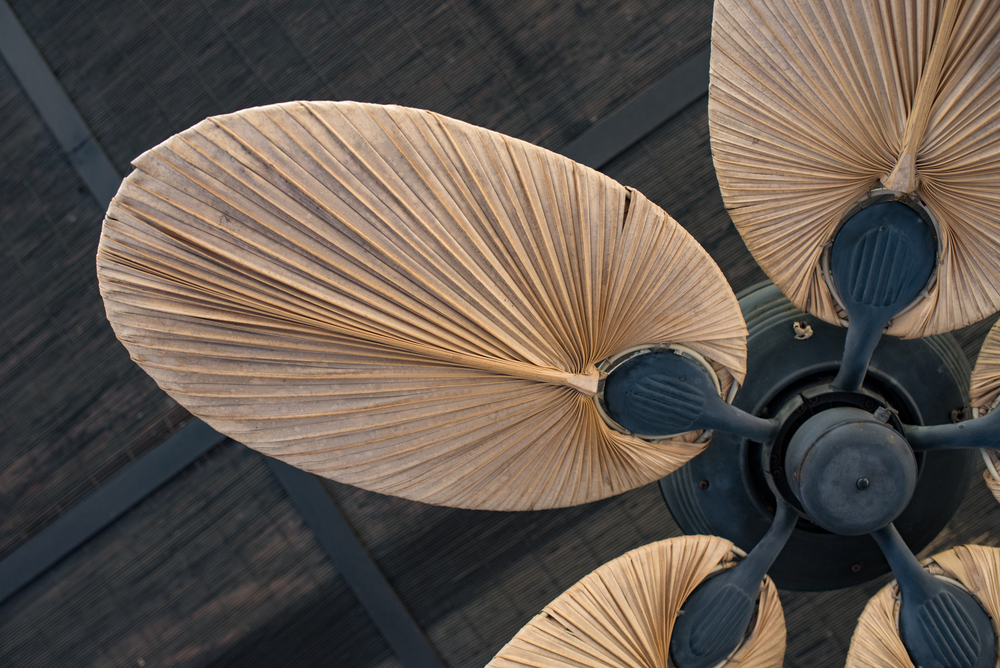
This living space uses nearly all natural materials and earth tones in its design to make a cozy conversation space. From the wood ceilings to the stone accents, the textures here are immaculate. Everything feels warm and welcoming. A wood ceiling fan matches all the decor and will give this homeowner an extra breeze on a hot summer day.
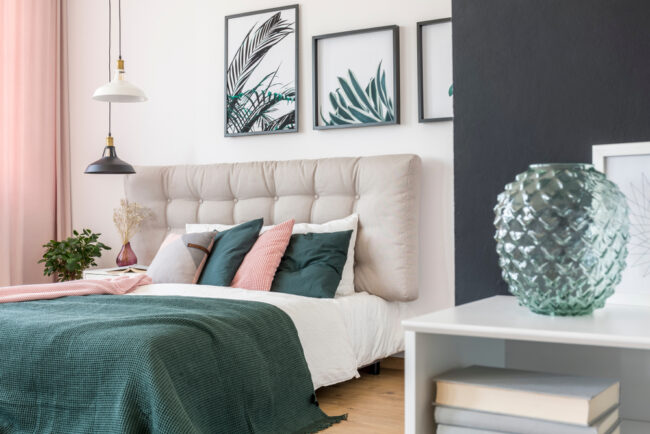
Bedrooms

The bedroom is the best place to be a little braver with your decor. It’s the place you should feel the most comfortable being yourself. Pick bolder earth tones and bring in all the natural materials to create a place that will allow you to be the best version of yourself!

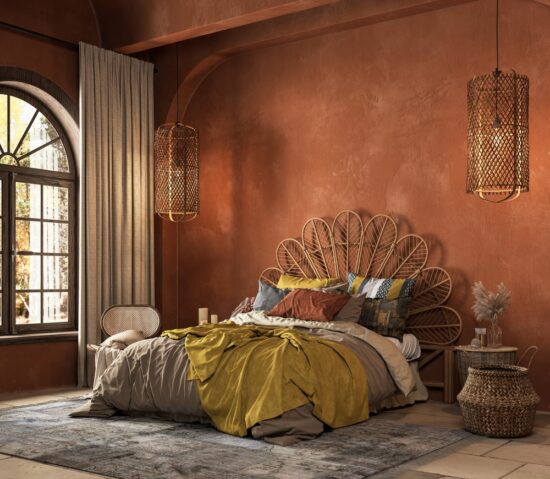
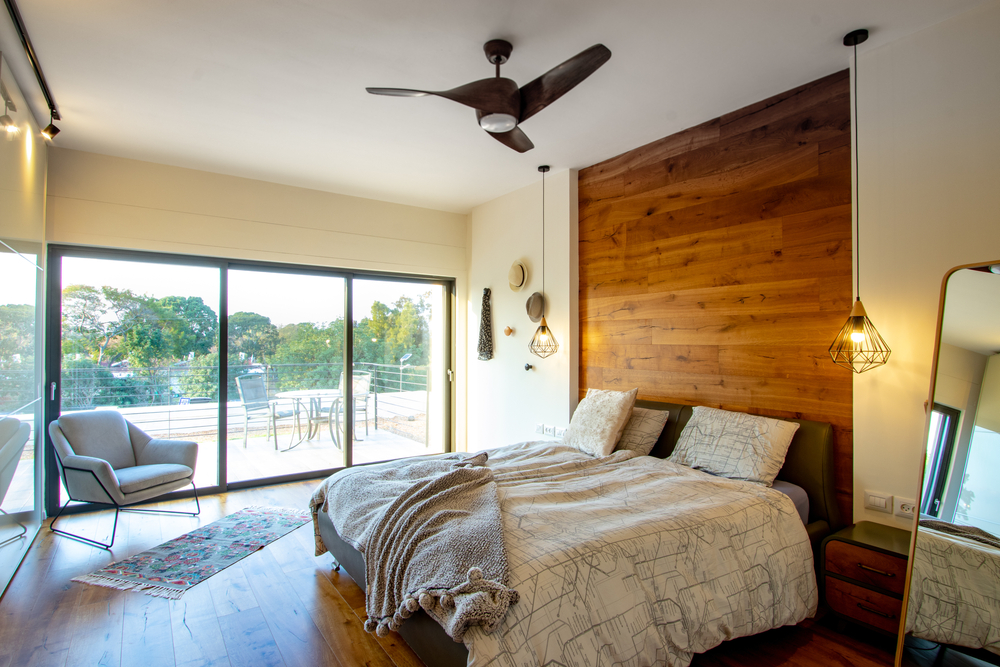
This cozy room pulls out all the stops. The way the headboard coordinates with the gorgeous pendant lights has our jaws on the floor! They give the room a natural glow and highlight that warm orange wall. To some a deep, rich color like this can be intimidating, but this bedroom is the perfect example of what can happen when the risk pays off.  

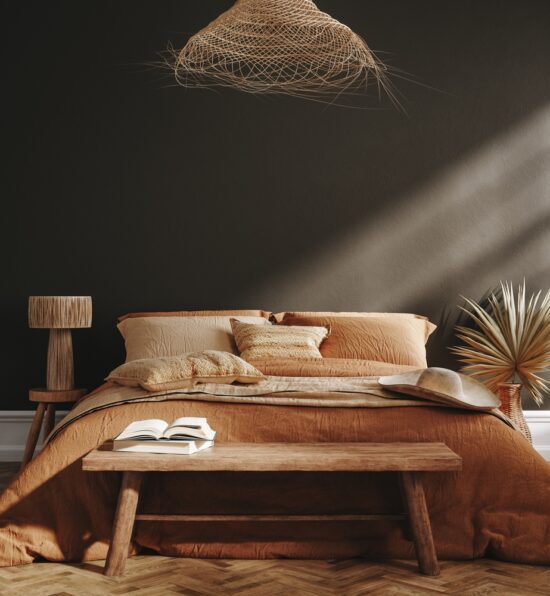
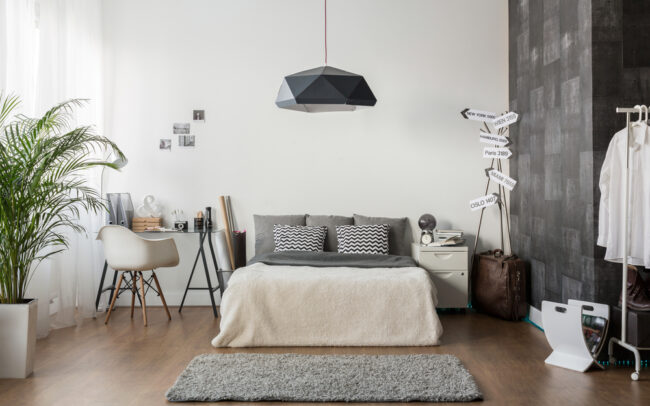
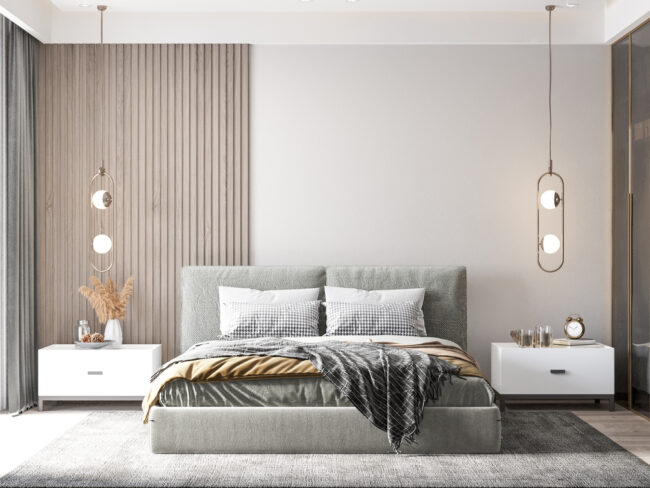
Going dark on the paint can be risky, but using light, warm colors to contrast it is a clever way to combat any heaviness and create balance. The pendant above the bed is a gorgeous focal point that ties in with the wicker and wood. A fixture like this gives off soothing, soft lighting that helps to prepare yourself for a good night’s rest. 

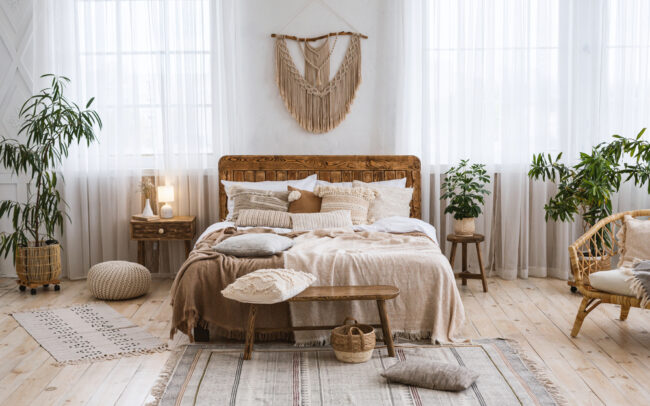
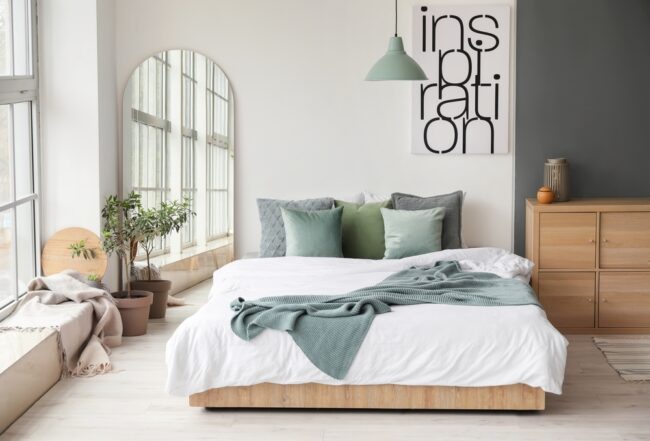
If light and airy is more your speed, use this room as inspiration. Natural textiles bring layers of texture and interest to this bedroom that make it feel cozy and inviting. The rugs and layered blankets make this space feel lived-in without feeling cluttered. Sheer curtains allow for lots of diffused natural light for a dreamy daytime vibe, and will reflect just the right amount of light at night to create a relaxing and comfortable atmosphere.

Kitchens

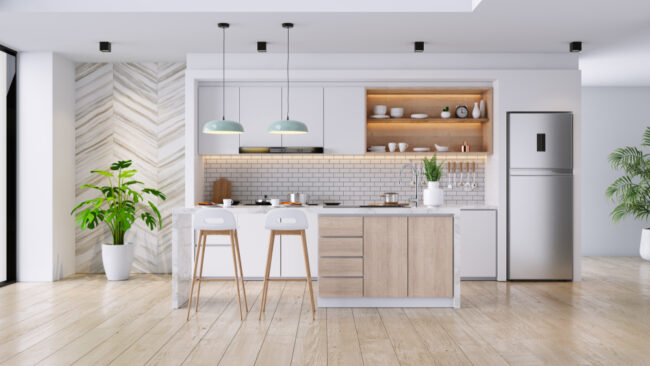
No matter your kitchen’s current style, a few extra touches from nature can make it a gathering space where you’ll love to spend time preparing and sharing food with your loved ones. 

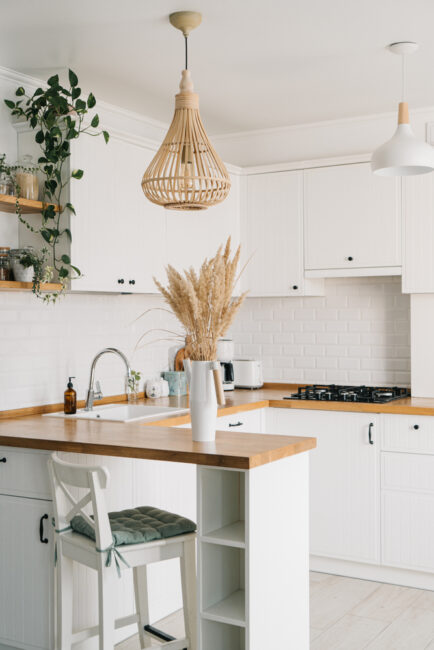
In a small space like this, details matter. The warmth in the butcher block counters and floating shelves stands out against the stark white of cabinets, creating a sense of balance without filling the space up with accessories. When space is small, a single bold choice is a great way to give it some personality – these mismatched pendants do just that! And of course, no nature-inspired space is complete without a little green. In a space full of hard lines, this pothos softens the edges just a little – and it’s perfect for the out-of-the way nook in kitchen since it won’t require much light. 

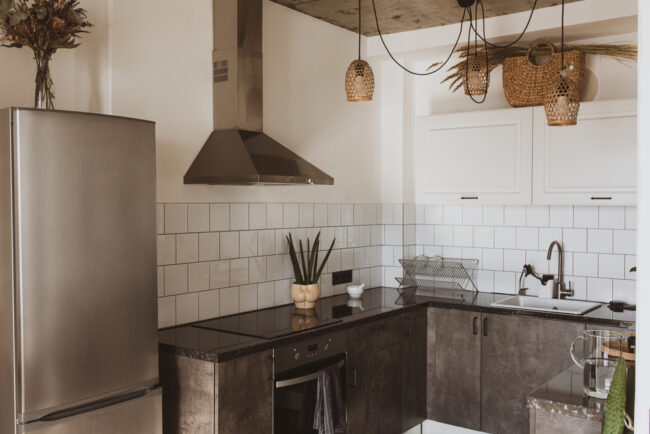
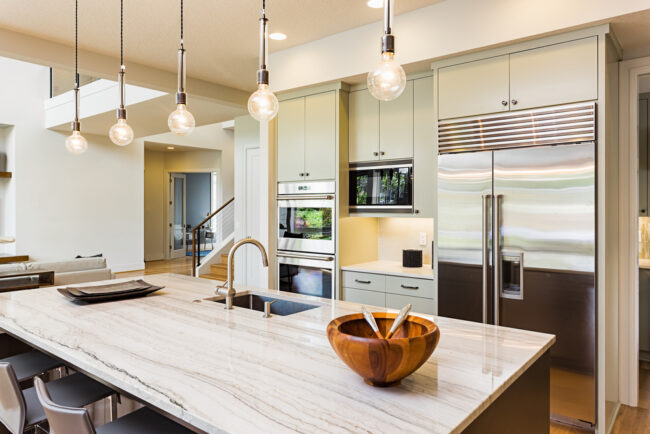
Going with darker textured cabinets was a bold move here. They almost look like they were carved straight from a mountain! In another space, they might look more industrial, but with the wicker pendant and basket, the white tiled backsplash, and the plants for accessories, it gives modern organic. The sharpness of the hard edges and metallic textures is softened by the natural textures and shapes throughout the space, like the draped pendant lighting – a smart choice that balances the design and makes it easier to see what you’re doing while you prep dinner.

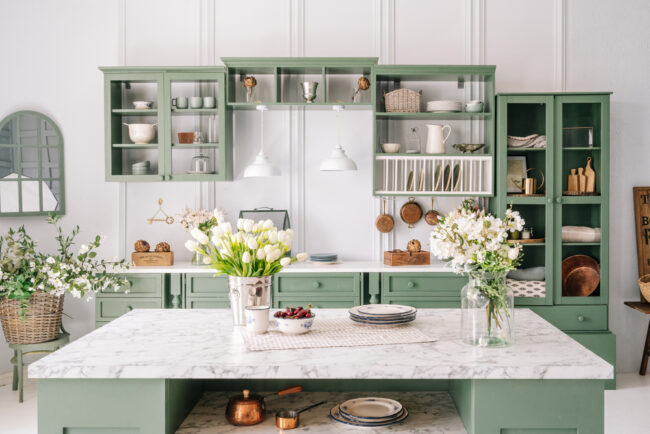
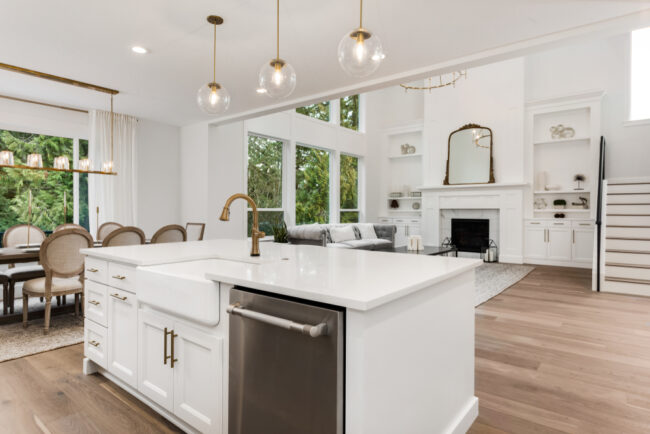
This kitchen is a marriage of light and airy and organic design. The green styled cabinets are perfect for storing the most beautiful cookware and dishes. Adding fresh flowers makes a kitchen feel fresh and beautiful. However, the icing on this wedding cake is the lighting! Those cute white pendants and this kitchen are a match made in heaven. They fit the space perfectly and will give you some much-needed task lighting.
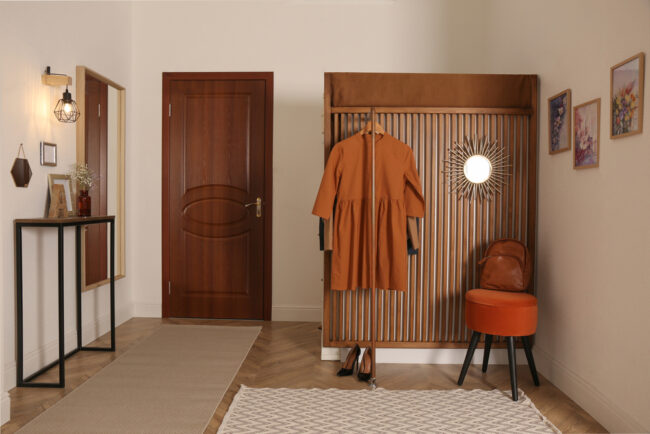
Nooks

Almost everyone has that spare corner in their home that they just can’t quite figure out what to do with. Adding a seating nook for reading or working one of our favorite tips to make a space feel cozy and welcoming. 

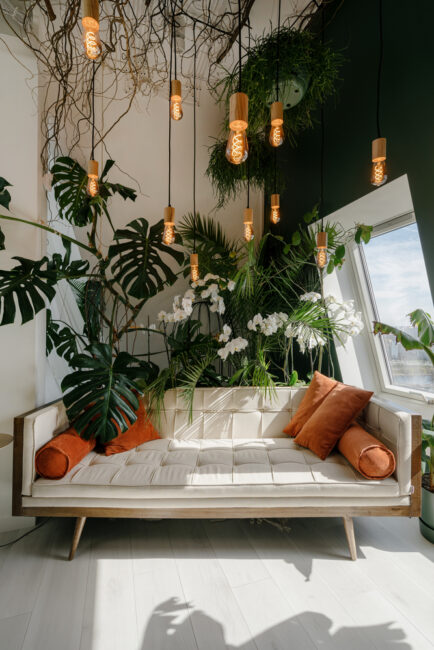
This little nook looks like Shangri-la in the middle of a house! Get cozy with a book and a blanket or just take a little rest here for some mid-day rejuvenation. Everything about this leans into the wildness of the natural world. Even the lighting is freeform and organic, these hanging pendants make this space feel like magic and will give you light to read no matter the time of day. 

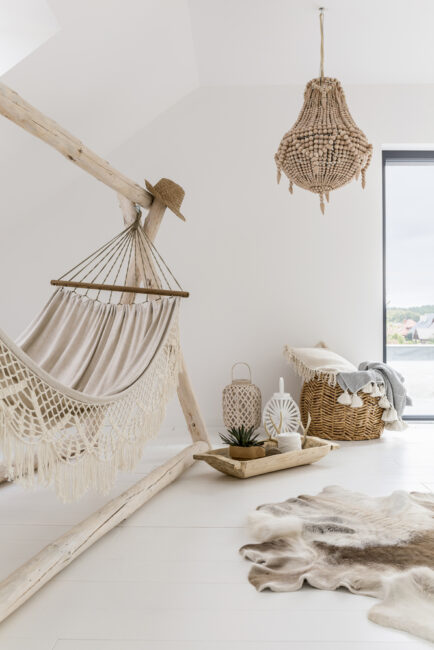
This boho-coastal nook is just what the doctor ordered for some me-time. We love a good hammock – and this one is just begging to be relaxed in. The driftwood frame with the macrame hammock turns this space from an empty white corner into a light and airy refuge. The beaded chandelier is an unexpected twist that ties perfectly with the accessories, making this nook feel like it’s just a few steps away from the beach.

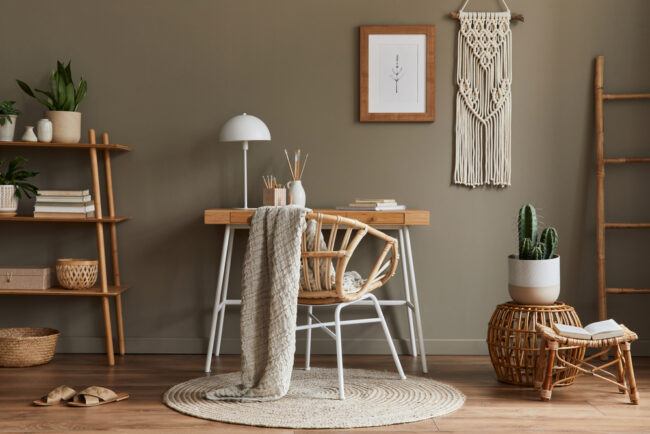
We can tell every element in this picture was chosen intentionally because it works together so well. From the wood and wicker furniture to a neutral color palette with a grounding green on the wall, you can’t get more organic than this! The dome desk lamp in white is a smart choice for task lighting – its small footprint doesn’t eat up work space, and the height and color make it pop against the dark wall behind it. This work nook may be small in size, but not in style. 

—

Using an earthy color palette and natural materials in your design is nothing short of gorgeous when it’s done well. We love this trend and want to help you create it in your home. Come visit Armstrong's Lighting and show us what inspires you. We’ll help you the find the perfect lighting solutions to create your own natural sanctuary.

Filed Under: 2023, Bathroom Lights, Bedroom Lighting, Buying Guides, Ceiling Fans, Ceiling Lights, Chandeliers, Kitchen Lighting, Styles and Trends, Wellness & Safety

How to Safely Replace A Ceiling Light

How to Safely Replace A Ceiling Light

by admin · Jan 20, 2023

Ceiling lights are a must-have feature in any room. Whether you don’t like the previous homeowner’s taste or you’re just ready for an update, ceiling lights can revitalize your home space. It may be even easier than you think–just follow these steps to safely switch out those old light fixtures for a new look.

What you’ll need:

  • Screwdriver
  • Step ladder
  • Voltage detector 

You may also need:

  • Wire cutters
  • Wire strippers
  • Pliers
  • Painter’s tape
  • An extra set of hands 

Part 1: Remove Old Fixture

Step 1: Turn off power

Shutting off the electricity is important to your safety. Locate the switchboard for the room you are working in and flip the switch. If you’re not sure where the switchboard is, check the basement or garage. It might also be in the front of the house or near the entrance.

Once you’ve flipped the switch for the room with the ceiling light, go back into the room and flip the switch a few times to make sure the power is off. Then, leave the light switch in the off position. Make sure you lock the circuit box or leave a note indicating that you are working. 

Step 2: Remove cover and bulbs

Use a stable step ladder to reach your ceiling light. Hold the cover, or the visible, outside piece of the light fixture, in place with one hand. Loosen the screws with a screwdriver in the other. (For heavy or large fixtures, it’s best to have someone else hold on while you work on the screws.

Once the cover is removed, unscrew the light bulbs and set them aside.

Step 3: Lower the fixture base

With the cover removed, you will be able to see the base–the part of the light fixture that attaches directly to the ceiling. Typically, the base will have tabs or nuts and screws securing it. Loosen the nuts or screws, then lower the base to access the wiring (In the rare case you’re unable to find the screws, search for the installation manual online. You can also take a picture of your base and bring it into our showroom – we’ll take a look and help you figure it out!)

Until you have disconnected the wiring, you will want to lower the base but not remove it completely—an easy way to do this is by securing it with painter’s tape or having someone else hold it in place.

Step 4: Disconnect the wires

Once you have uncovered the space behind the old light fixture, there should be a junction box where wires are connected and stored. Start by removing the caps or tape covering the wire connections. The caps will come off when twisted counterclockwise.

 Pro Tip: Take a picture beforehand so you can remember exactly how everything was put together. 

Part 2: Connect the Wiring

Step 1: Test voltage

Test each exposed wire by touching it with the tip of your voltage detector. 

If the voltage detector lights up, there is a current running through, and the wire is unsafe to touch. Double-check your circuit box and ensure the switch is still flipped. 

Once you’re sure there is no electrical current, you are safe to continue working with the wires.

Untangle the wires and detach the fixture from the ceiling completely. Either hand off to someone below or carefully carry it down the ladder.

Step 2: Check wires

Frayed wires can be hazardous -if there is any fraying on the end of the wires, trim them down with wire cutters. Then, strip off any insulation on the outside with wire strippers. You only need to strip about ½ inch of insulation for the wire connection.

Pro Tip: Check your new fixture’s installation recommendations carefully. If you’re installing a heavy fixture such as a ceiling fan or chandelier, you may also need to install an additional support in the ceiling. 

Step 3: Match and Attach

Electrical wires are color-coded. Black or red are hot wires, white is neutral, and green or bare copper are ground wires. A grounding wire sometimes connects to a grounding screw instead of another wire. Look for a matching wire in your ceiling for each wire in your fixture.

Twist together each matching wire. Either by hand or with pliers, hold the exposed ends side by side with one hand and twist with the other. (This is where your picture of the original fixture’s wiring comes in handy.)

Now that the wires are connected, it’s important to cover the exposed ends again. Screw the wire caps on by twisting clockwise over the connected ends until they hold the wires tightly in place. If your original fixture didn’t have wire caps, you can use electrical tape as well.

Make sure to check the owner’s manual for specific instructions—for example, you might have an extra red wire that connects to a black wire. If you don’t have any instructions, generally you will be fine with just matching the correct wire colors.

Part 3: Install New Fixture

Step 1: Replace junction box

With all your wiring safe and sound, the junction box is ready to be put back into place. Tighten the screws securely against the bracket until  Fold the wires up into the box so they will be hidden behind the ceiling light.

Step 2: Attach new fixture

There are several different ways your new light fixture base could attach to the ceiling—these are the most common ways. As always, check the owner’s manual for anything specific or unique about your light.

Securely attach the light base by positioning it over the mounting screws. Place a metal nut on each screw and twist by hand until they are tightly holding the base in place.

If the fixture has a mounting bracket, connect the mounting bracket to the junction box first, then hang the base over the screws.

If it’s a keyhole shape, adjust the base so the screws slide into the smaller grooves and then tighten the screws with a screwdriver until they are holding the base securely.

Step 3: Install light bulbs

Now that your base is set, it’s time to add the light bulbs. Make sure you have the correct wattage—the fixture typically indicates its maximum wattage on the package or owner’s manual. 

When choosing which bulbs to use, the lower the wattage the safer. Most light fixtures are safe with up to 60 watt incandescent bulbs. You may also want to consider more eco-friendly choices, such as CFL or LED bulbs. These options have lower wattage but produce the same amount of lighting, saving you money on electricity in the long run.  

Test the bulbs by turning the electricity back on—flip the switch on the circuit breaker then turn on the room light switch. If it is flickering, dim, or not turning on at all, turn the electricity off again and check everything—look for loose connections or mismatched wires. If your lights are bright and solid, you are ready for the final step.

Step 5: Attach cover

Flip the light switch and circuit breaker back off before installing anything else. Take your light fixture’s shade, cover, or top and climb back up the ladder. Attach it to the base by twisting screws or attaching pieces until everything is tight and secure. If it’s a hanging light, make sure it’s at the proper height before finishing your work. Every light has different connecting components, so check your owner’s manual and just make sure it’s snug.

And there you have it, your guide for installing a new, updated ceiling light. Now that you know how to install it, make sure to visit our showroom to choose the perfect fixture for your ceiling!

Filed Under: 2023, Buying Guides, Ceiling Lights, Styles and Trends, Wellness & Safety

Next Page »

Copyright © 2023